As a digital nomad traveling with 2 dogs, keeping track of all their medical and vaccine records has been challenging. Especially since one of our dogs has had some recent health issues. I needed a way to organize all the vet visits, test results, vaccine certificates, etc. as well as be able to share them with new vets and our primary vet back in Colorado. Thus, an R Shiny app was born.
You can view the app here.
This was my first Shiny app and I started by taking the DataCamp course Building Web Applications in R with Shiny. This course provided a solid foundation to get started with building my app. For this post, I want to share some of the more challenging aspects of creating this app and how I handled them.
Data
Data Wrangling
Before hitting the road full time, I just let our vet keep track of our dogs’ medical and vaccine records. However, once we hit the road, I started doing this myself, knowing that I could no longer rely on our primary vet to remind me when our dogs were due for something. I had been doing a pretty good job of keeping track of things, but some things were in notes in a word doc, other things were pictures of receipts and vaccine certificates in iPhoto, other things were saved in a spreadsheet. The data that I had collected over the year and a half we have been on the road was disjointed, to say the least.
So, with a rough draft of what my app would look like, I started to organize the data. I wanted to store the data in a database because although I am using this for my own benefit, I knew if I developed a Shiny app in the future as a part of my job or for a company, the data would most likely be in a database. I was also trying to make an app that was scalable, even though I only have two dogs. My data mostly consisted of structured data that fit nicely in a database, but I also had images and PDFs of vet visit receipts, test results, and vaccine certificates.
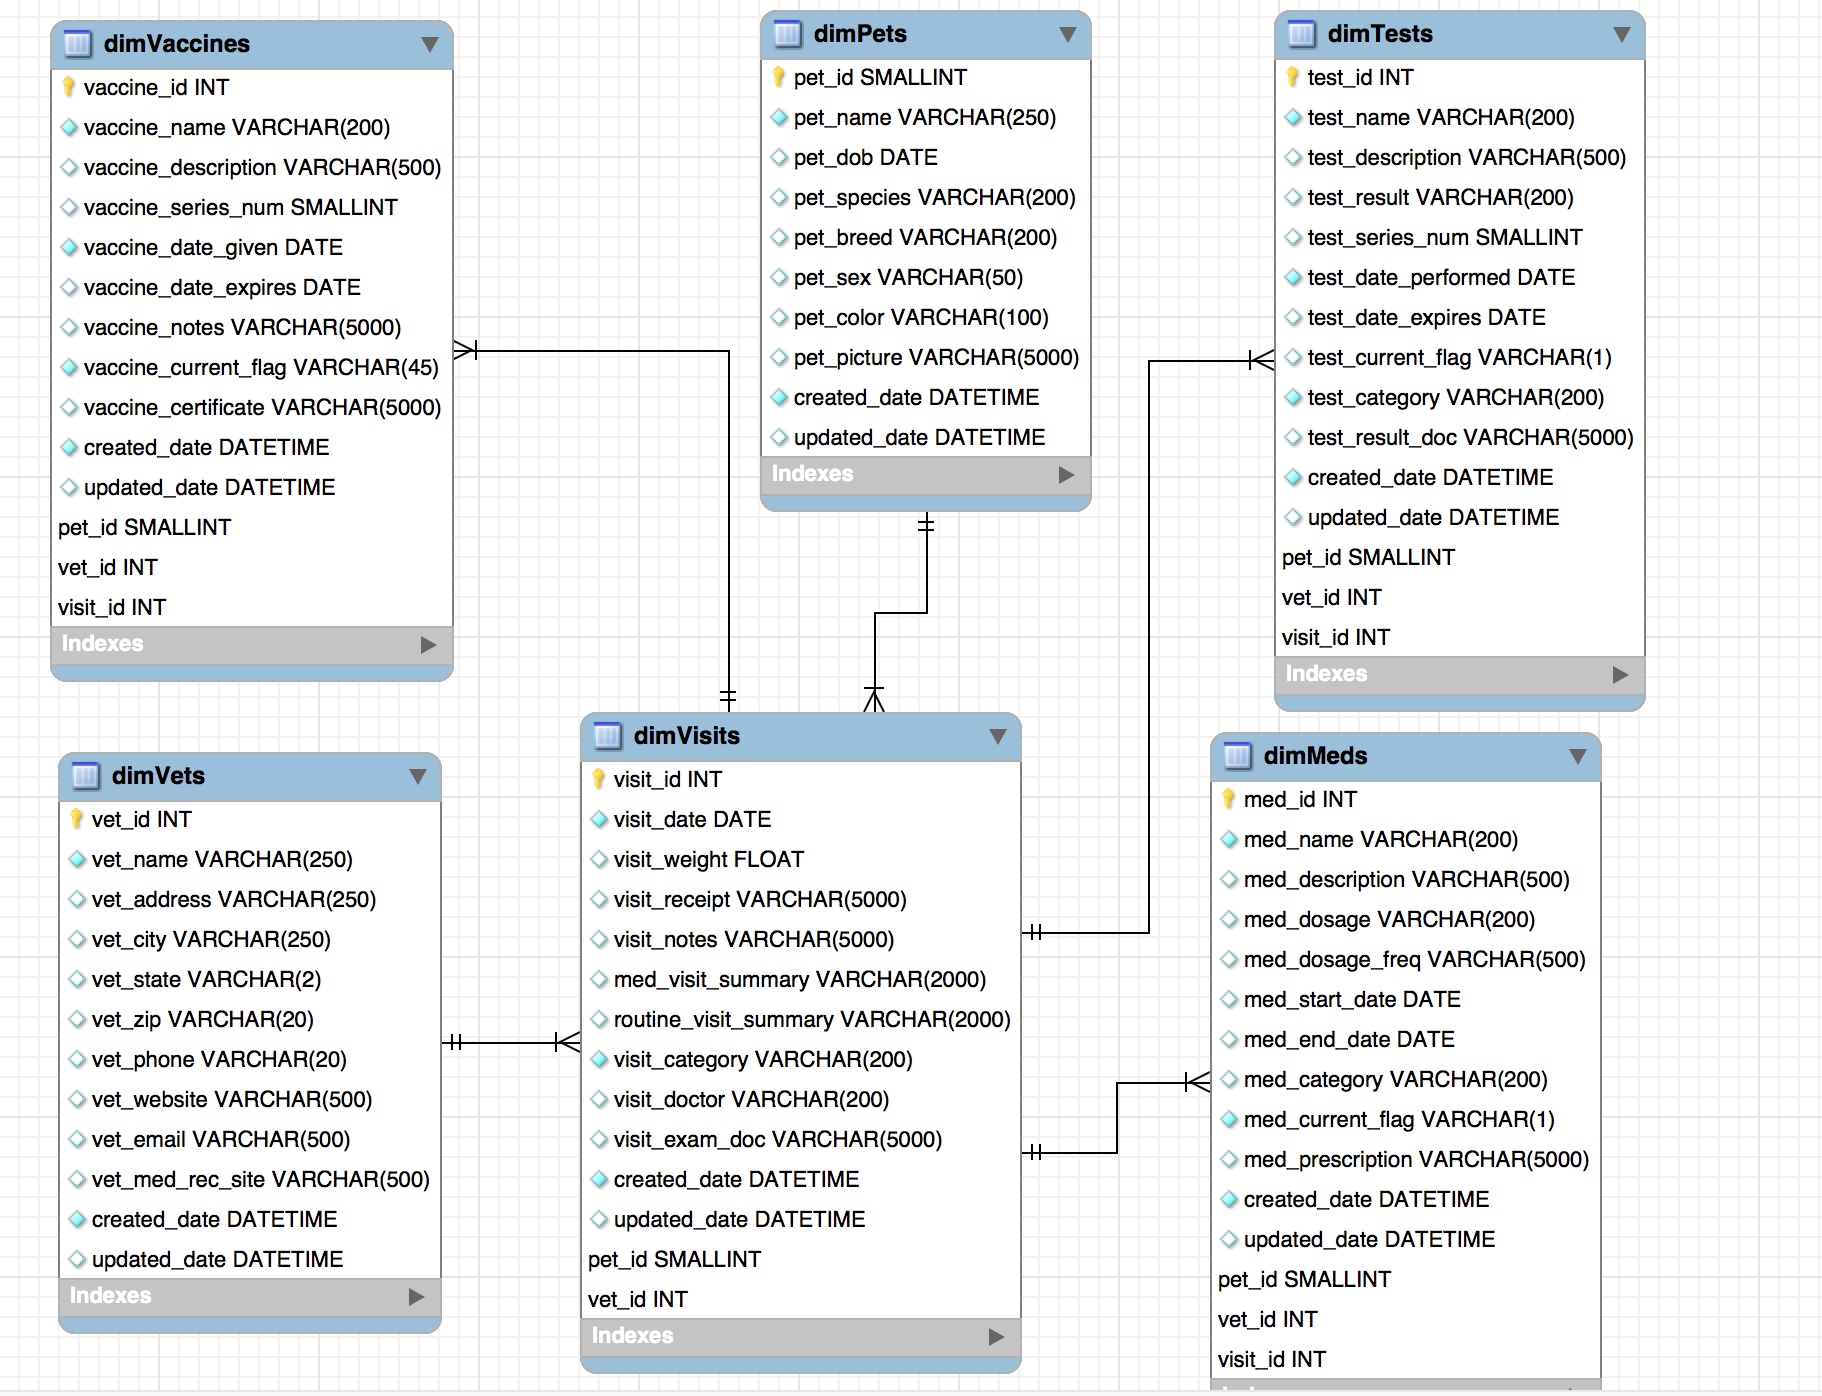
I decided to store the structured data in a MySQL database running on AWS and the unstructured data (images and PDFs) in Amazon S3. I stored the URLs to the documents housed on S3 in various fields in the MySQL database. The final data model looked like this:
Dynamic Data
With all of the vet visits that have been going on lately, I knew I wanted my app to be able to pull in new data once I updated the database with any new meds, visits, vaccines, etc.
RStudio did a great blog series on working with databases in Shiny and I started by reading those articles. Right off the bat, the article quotes Hadley in saying “If your data fits in memory there is no advantage to putting it in a database: it will only be slower and more frustrating.”
Not surprisingly, I found this to be absolutely true. I started out by using dplyr and pool to query my database just to see how performant it would be. With this approach, instead of bringing the data into memory, I was querying the database each time within the render functions. This was noticeably slower than having the data in memory even for my teeny tiny database.
Since the data easily fit in memory, I knew I had to find a different way to get new data into the app without using the pool/dplyr approach. I ran across the reactivePoll() function, which seemed to do the trick. reactivePoll() allows you to set a time interval, a checkFunc, and a valueFunc. The time interval specifies the number of milliseconds to wait between running the checkFunc. The checkFunc is a function that checks if a value has changed (e.g. checks a time stamp to see if a database has been updated) and the valueFunc is used to get the new data if the value returned by checkFunc has indeed changed.
Here is the code I included in my server.R file before the server function to check for and get new data.
# getting the data outside of server function, so data is created once
# and shared across all user sessions (within the same R process)
# reactivePoll performs check function every 24 hours
# get the data
pet_records <- reactivePoll(86400000, session,
                            checkFunc = function() {
                              con <- dbConnect(MySQL(),
                                               username = Sys.getenv("RDSpetsuser"),
                                               password = Sys.getenv("RDSpetspw"),
                                               host = Sys.getenv("RDShost"),
                                               dbname = 'PetRecords')

                              # gets max date from database view to determine if data has been updated
                              max_date <- dbGetQuery(con, "SELECT MAX(cu_date) AS max_cu_date
                                                     FROM viewMaxCreatedUpdatedDates")

                              # disconnect from RDS
                              dbDisconnect(con)
                              return(max_date)
                              },

                            valueFunc = function() {
                              con <- dbConnect(MySQL(),
                                               username = Sys.getenv("RDSpetsuser"),
                                               password = Sys.getenv("RDSpetspw"),
                                               host = Sys.getenv("RDShost"),
                                               dbname = 'PetRecords')

                              tables <- c("dimPets",
                                          "dimTests",
                                          "viewVisitsPets",
                                          "viewRoutineMedHistTimeline",
                                          "viewMedHistTimeline",
                                          "viewVisitsVets",
                                          "viewVisitsTests",
                                          "viewVisitsMeds",
                                          "viewMedsPetsVets",
                                          "viewVisitsPetsVets",
                                          "viewVaccineHistTimeline")
                              df_list <- setNames(map(tables, ~ dbReadTable(con, .)), tables)

                              # disconnect from RDS
                              dbDisconnect(con)

                              return(df_list)
                            }
                           )
For all the tables in my database, I have an ‘updated date’ and a ‘created date’. I created a view that gathers all the created and updated fields from each table and puts the max value of those time stamps into a single column. The checkFunc connects to the database, queries that view, and checks to see if the max time stamp has changed. If it has, then new data is brought into the app. If it hasn’t changed, the valueFunc in not run.
Doing it this way is much faster than using the pool/dplyr approach and still allows the app to receive updated data without republishing the app each time the data is changed.
As a general note, I did create a read only MySQL user name and password to use for checking and getting new data. After reading the RStudio blog posts about SQL injection attacks, I decided that since users didn’t need to write anything back to the database, I would be extra cautious and just use a read only user for these queries.
Using Amazon S3
Before this project, I had heard of Amazon S3, but had never actually used it. I knew it was just a cheap way to store lots of data. To get started you first need an Amazon Web Services account. S3 itself is not hard to use. You basically just create a bucket (folder) and upload your PDFs, images, etc. into the bucket. You can make the entire bucket or individual items in the bucket private or public. I decided to keep the bucket that I stored my data in private because I figured that was the more likely real world scenario I would encounter.
Because I used a private S3 bucket, I needed a way to authenticate through R so I could display the PDFs and images stored in S3 within my Shiny app. There happens to be a great package for doing just that, aws.s3. This package is a part of the cloudyr packages for AWS services and allows the use of credentials specified in a number of ways. Check out the github repository readme for more info. I decided to store my credentials in a .Renviron file. Conveniently, when publishing a Shiny app to shinyapps.io you can include this .Renviron file in the root directory of the app and the app can access your credentials from there.
Ok, great. I figured out where I’m going to put my credentials, so R has access to them and can therefore display my private documents in my app, but what credentials do I need exactly and how do I get them? For some reason, I find the security documentation and concepts in AWS vastly confusing. I usually spend a lot of time reading through an article only to understand about half of it then clicking on a link within the article that I’m sure will make more sense, only to find that I only understand about half of that article, then again clicking on another link that will surely make more sense but usually never does…that process repeats about 100 times.
Anyway, here is what I figured out.
- I needed to put an access key ID and secret access key in my .Renviron file to authenticate my requests from R to Amazon S3
- Do NOT use your AWS account root user access key. The root user is the info you used to sign up for AWS. The root user access key gives full access to all your resources for all AWS services, including your billing information
- The AWS account root user access key has to be created. I had never created an access key for my root user and never did
- Amazon recommends creating IAM (Identity and Access Management) Users and Groups to manage access
I first created an admin user following the instructions in the section “Creating an Administrator IAM User and Group (Console)” from this article. This is a best practice that Amazon recommends.
I then created a new user and group to allow access to the specific S3 bucket I created to store my data by doing the following:
- Navigate to https://console.aws.amazon.com/iam/ and sign in with the admin user created above
- In the navigation pane, choose Users and then choose Add user
- Type in the name of the user and select “Programmatic access” as the access type to generate an access key ID and secret access key
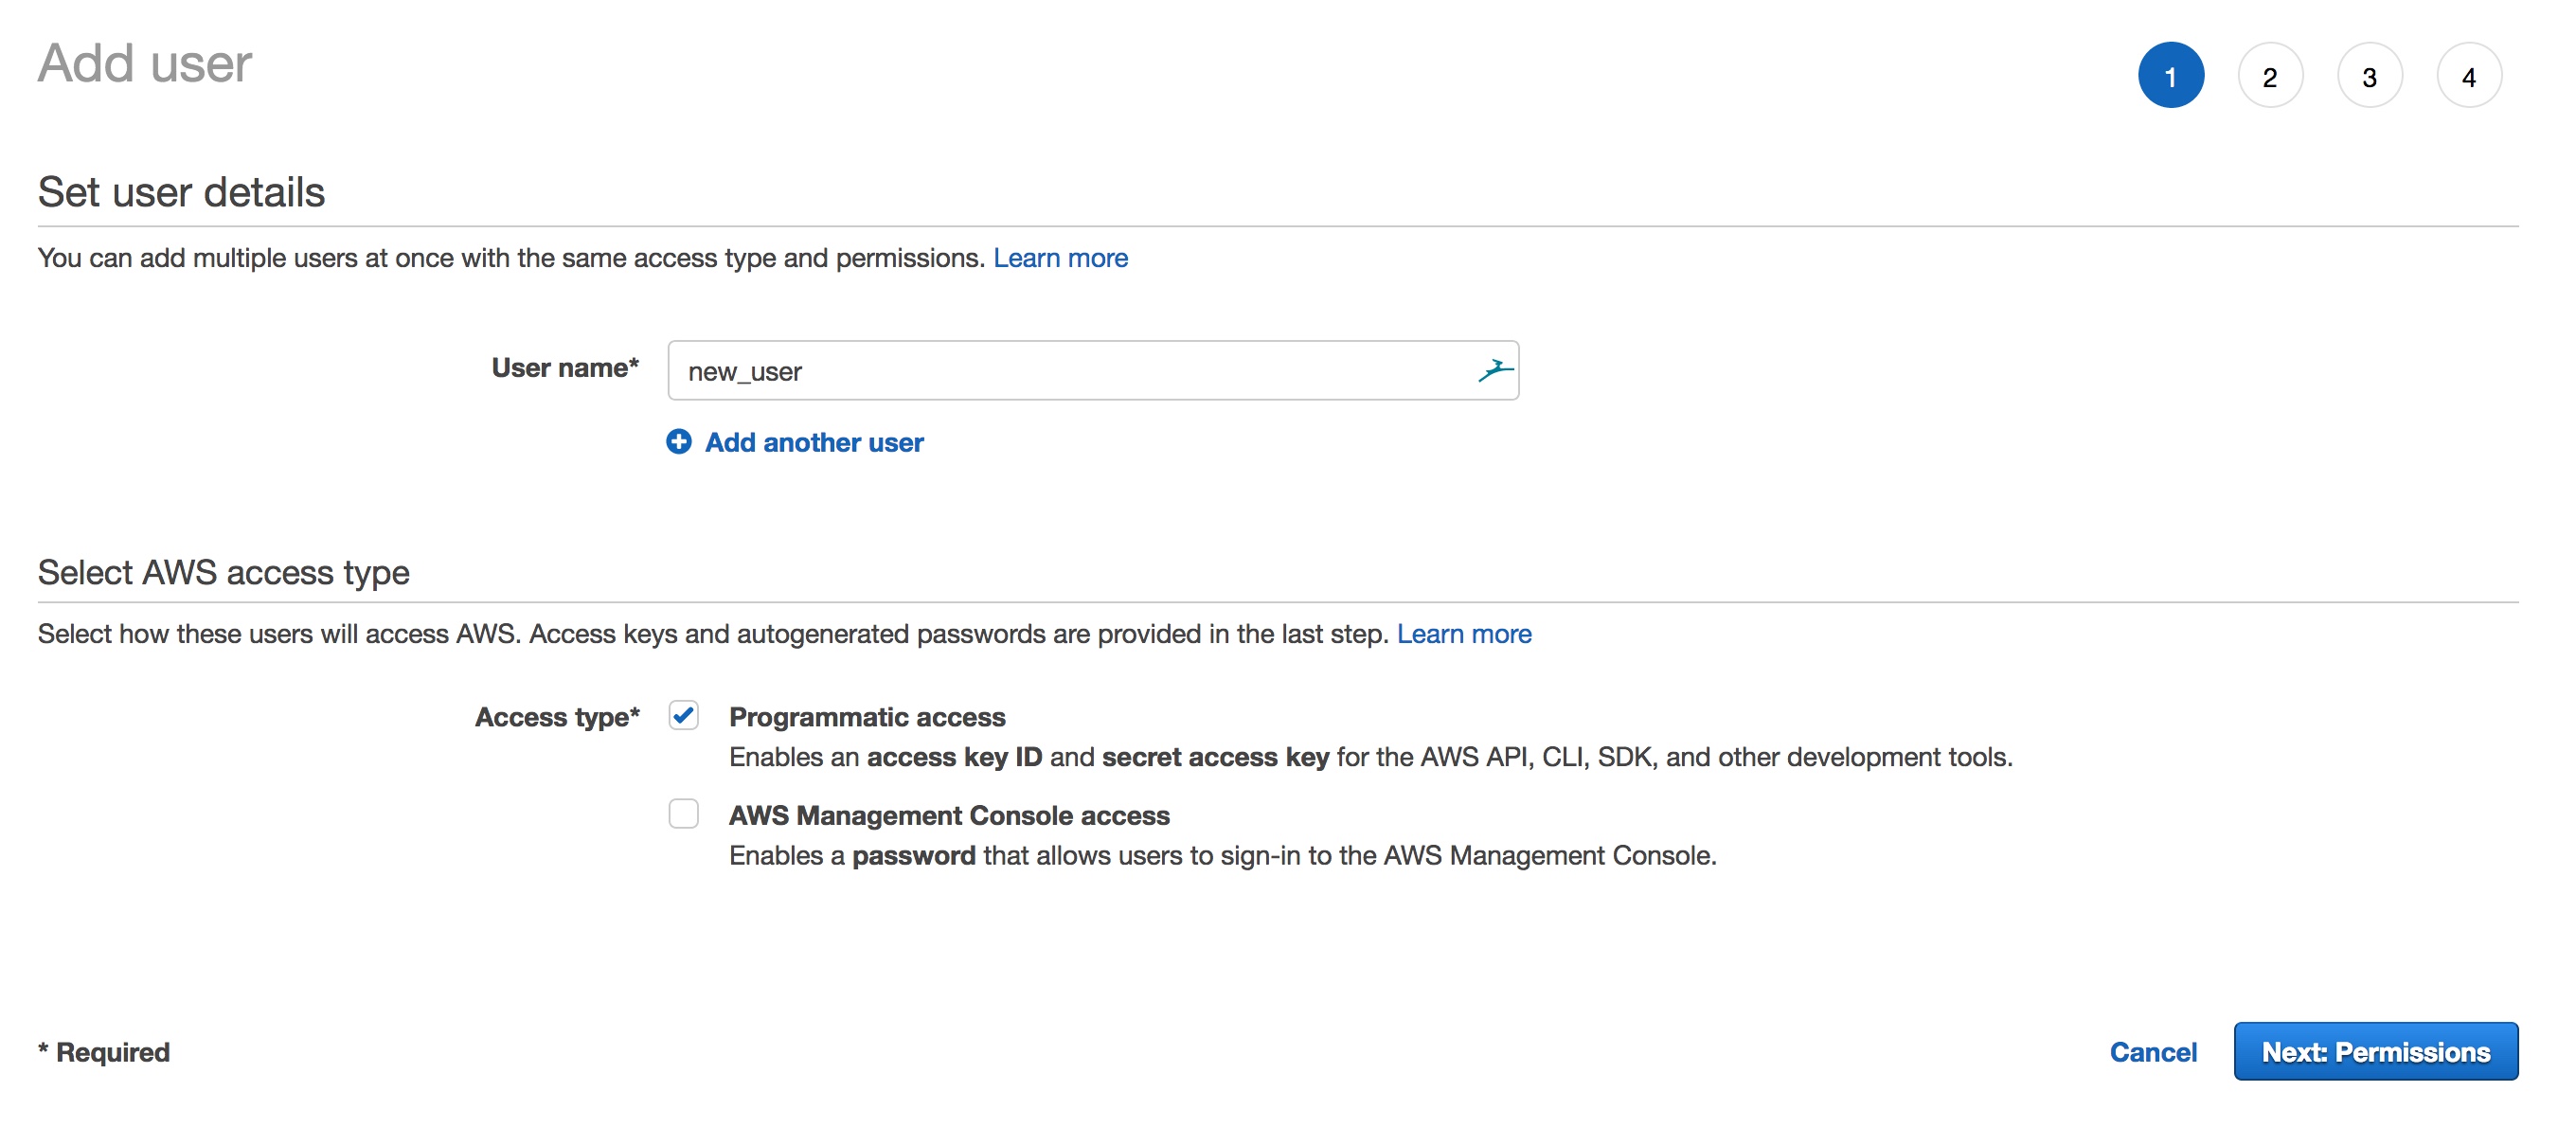
- Choose Next: Permissions
- On the Set permissions for user page, choose Add user to group
- Choose Create group
- Type in a “Group Name” and select the policy you want to apply

If you search for S3 in the search window, there are a few options that come up. I wanted to allow read only access to a specific bucket within S3, so none of the predefined policies would work for me. There is an AWS managed policy that provides read only access to all buckets, which you can choose if it fits your needs. Instead I needed to create my own policy.
To do this I did the following:
- Choose Create policy
- Choose S3 as the Service
- Under actions select the “Read” check box
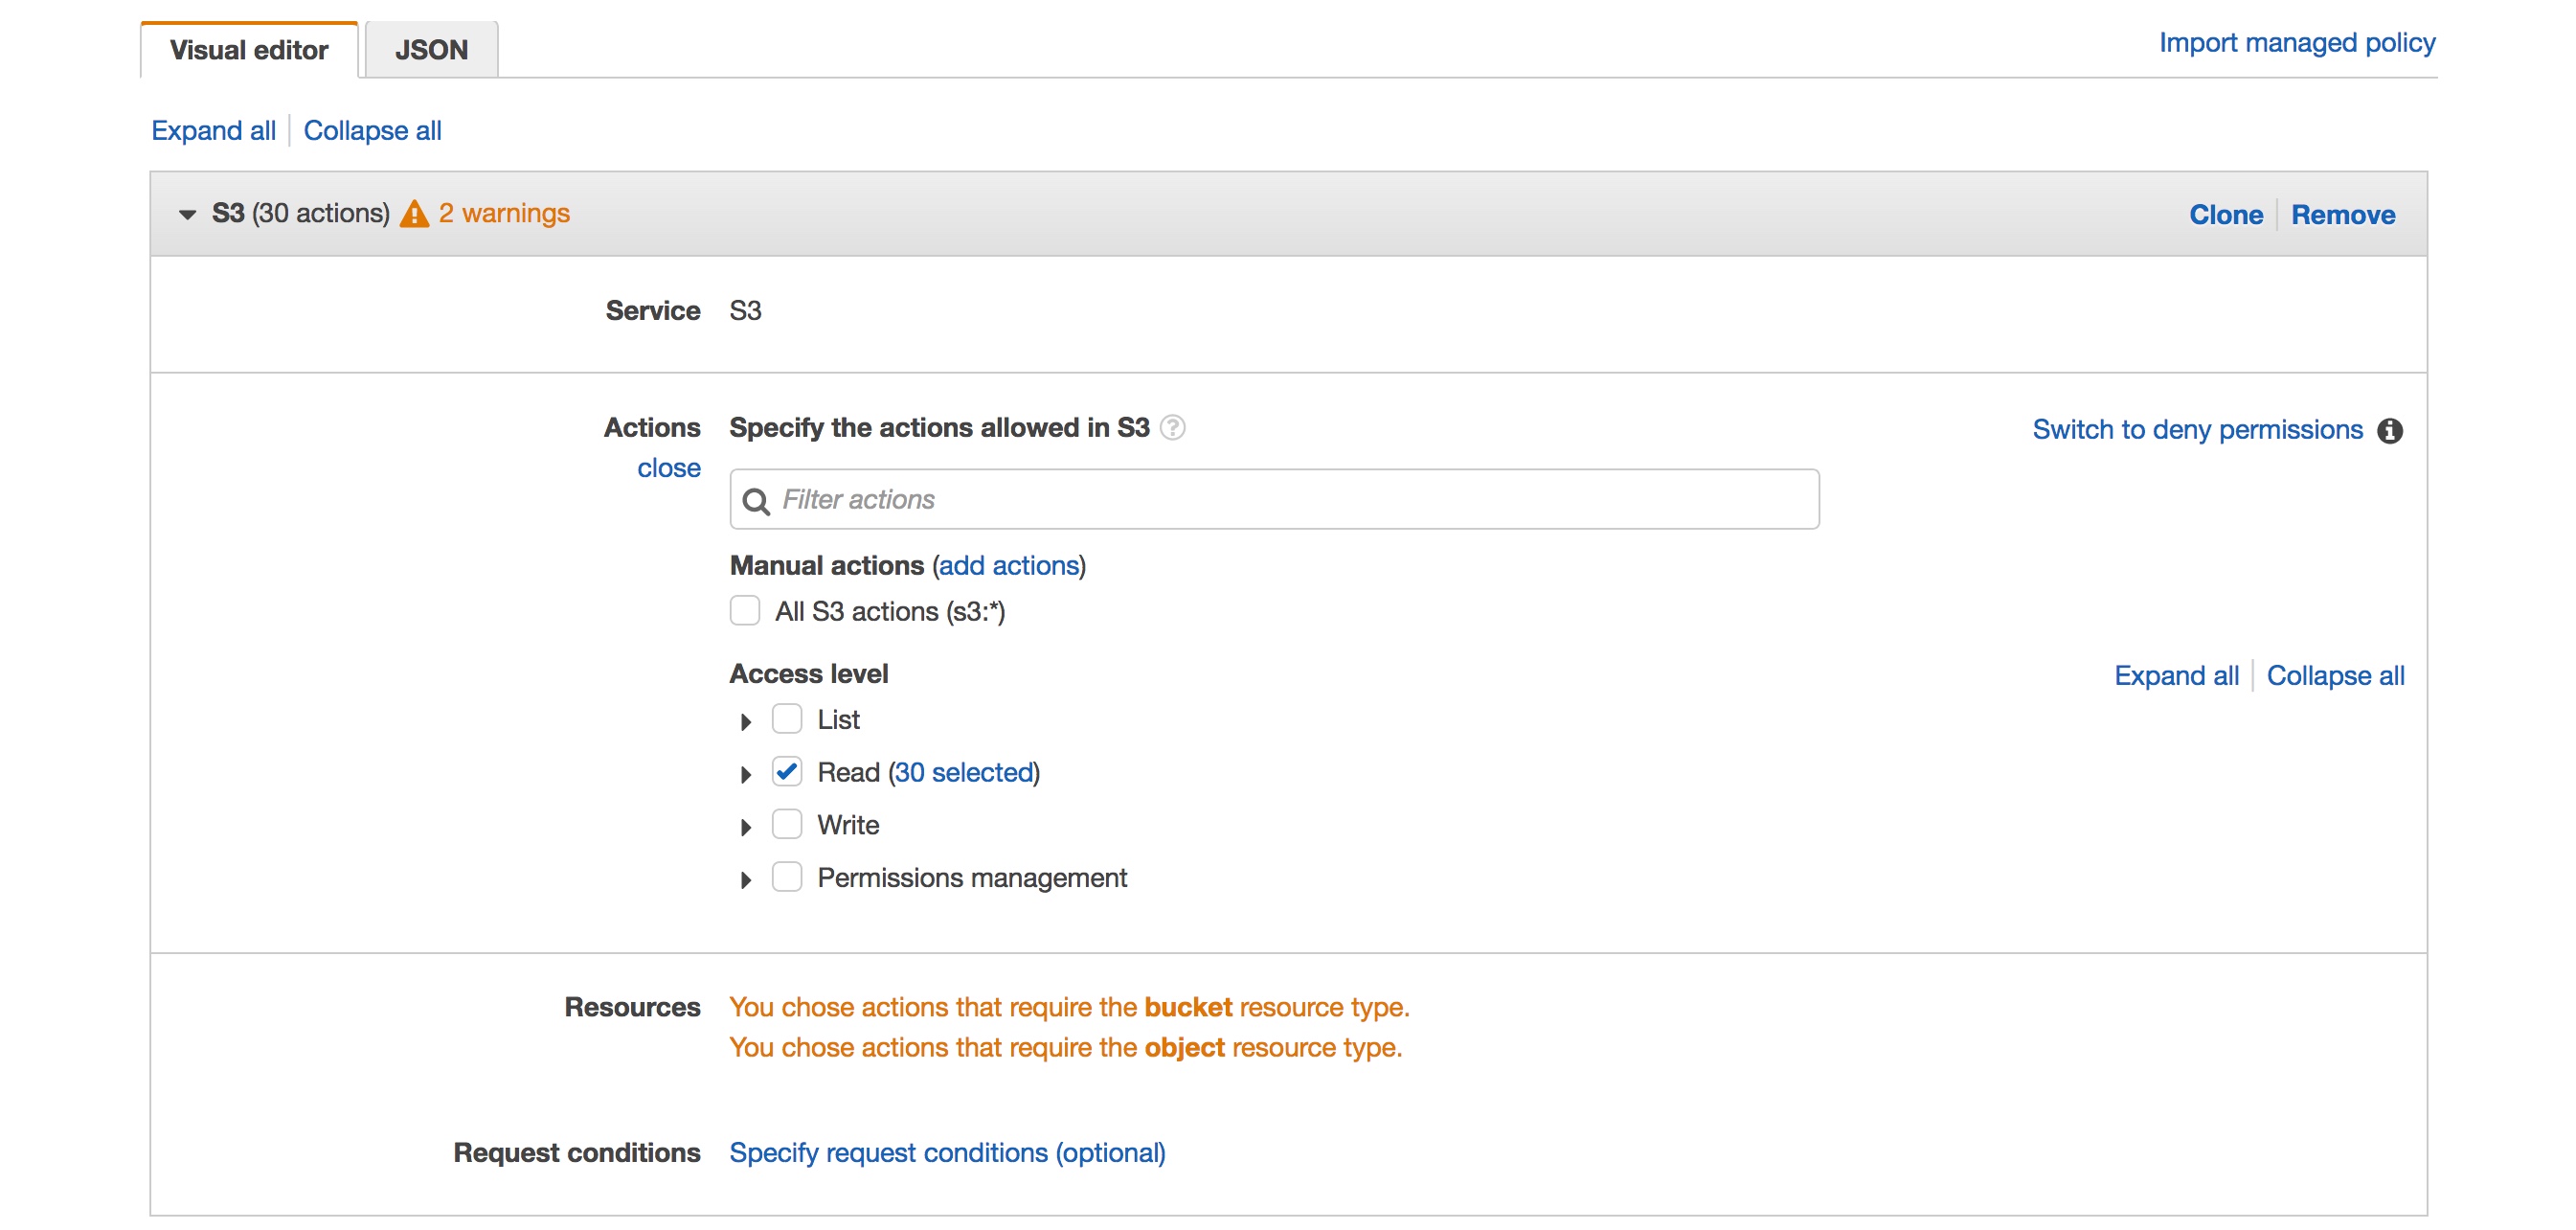
- Under resources I added the specific bucket I wanted to allow access to by selecting “Add ARN” and typing in the name of the bucket, select the “Any” box for objects
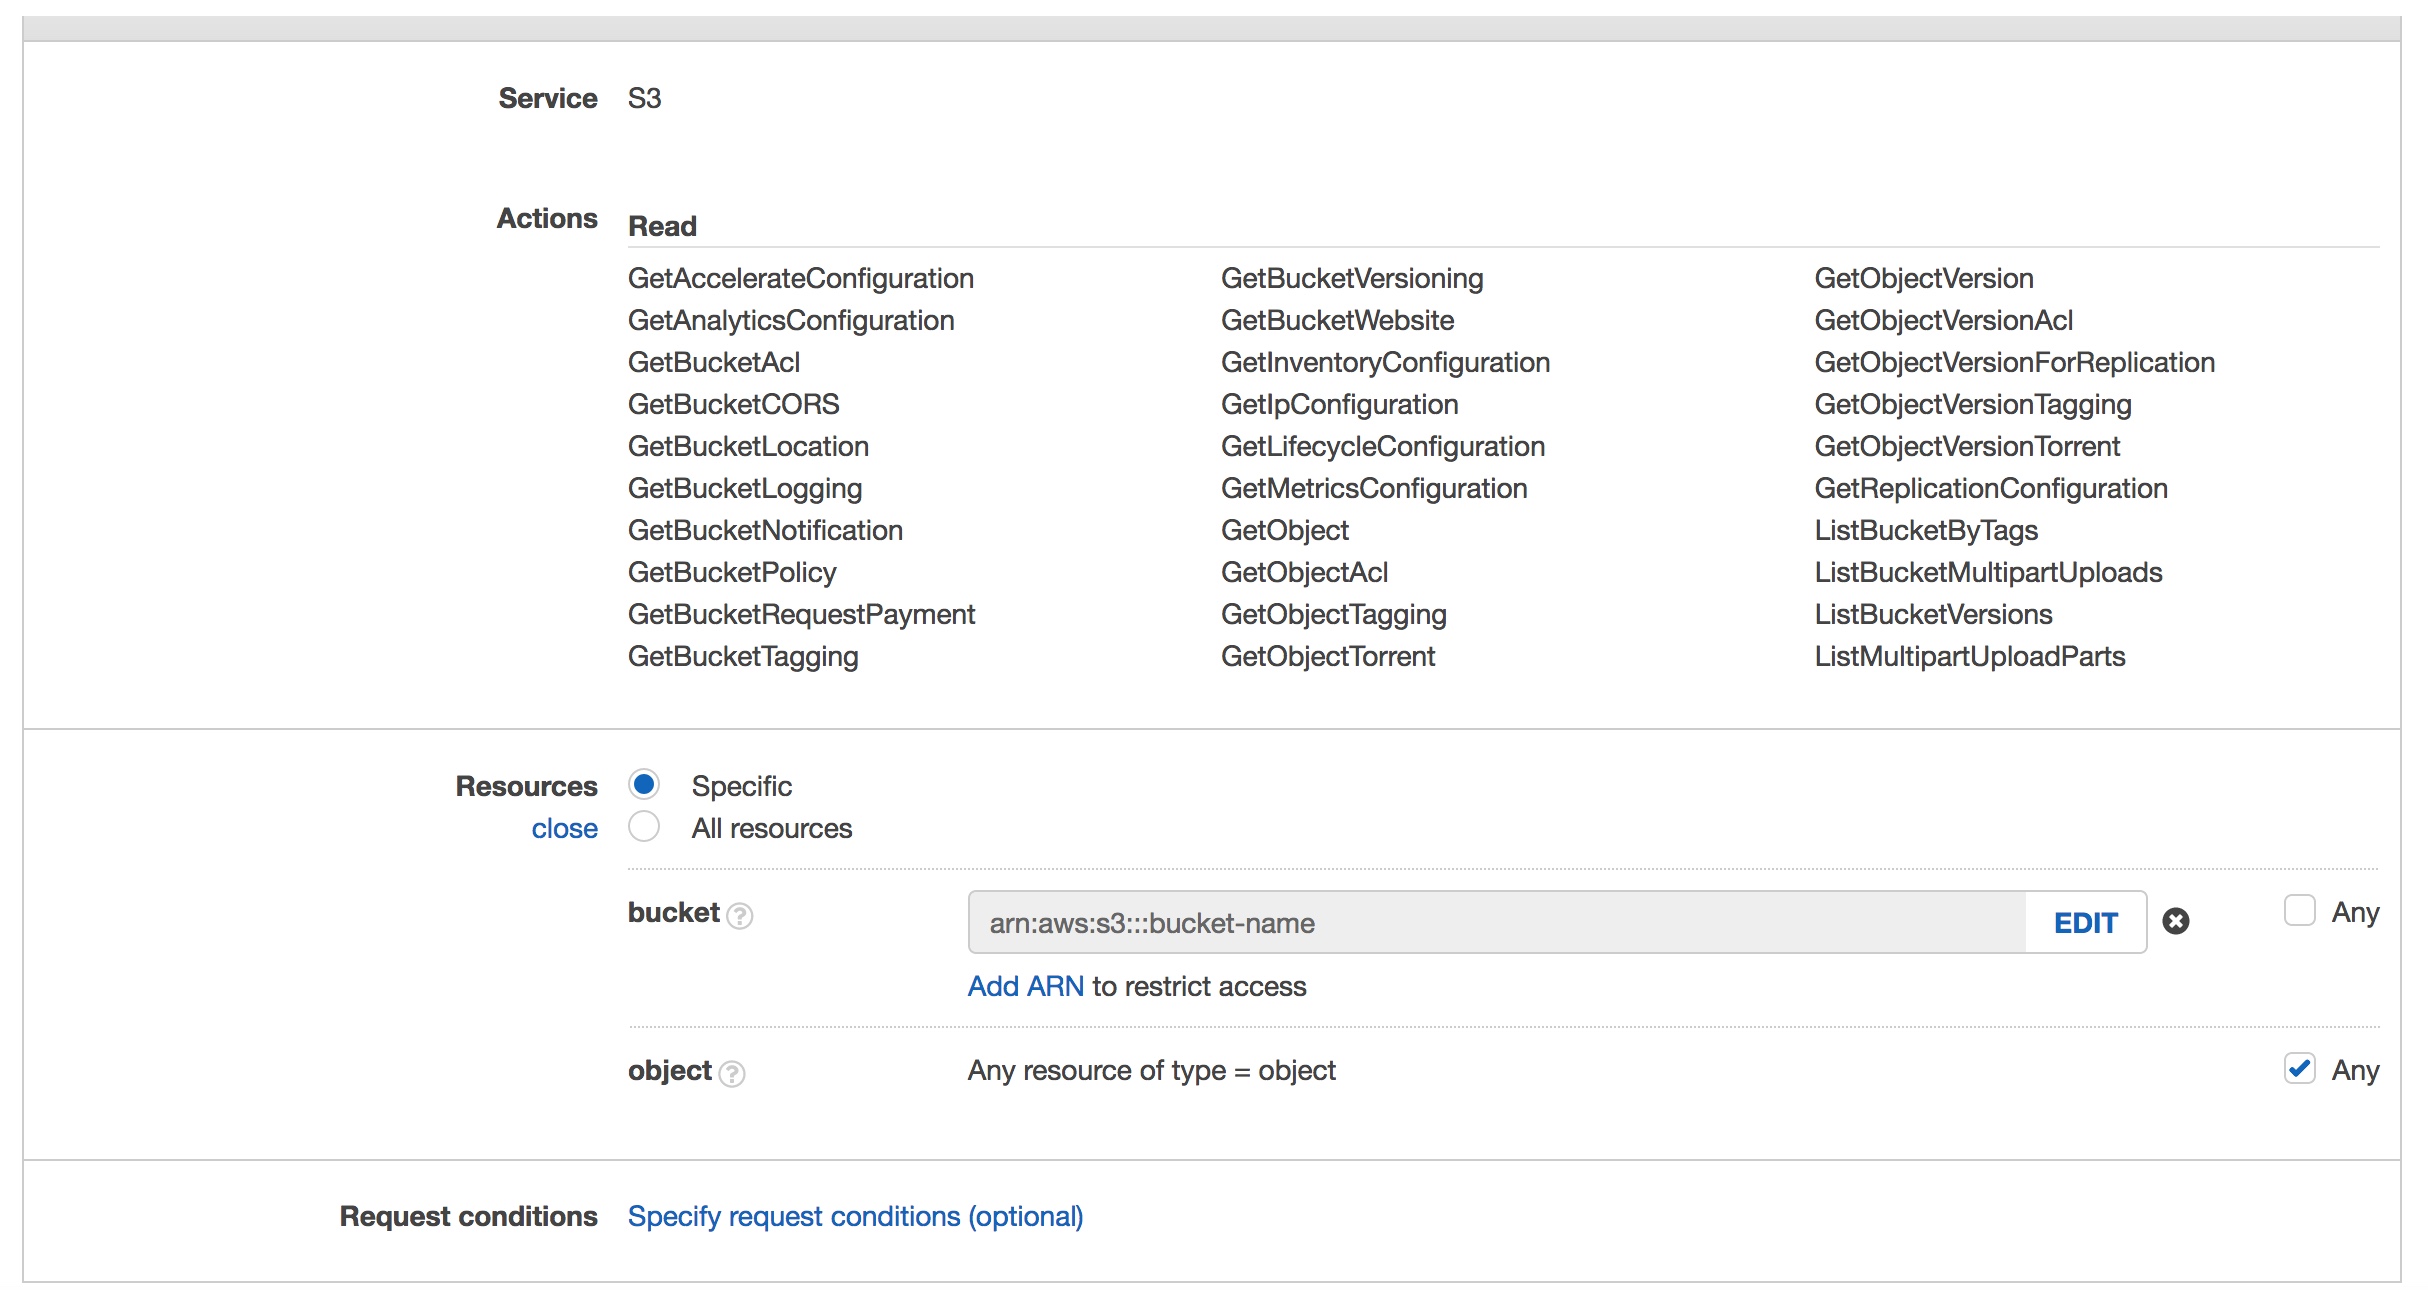
- Choose Review Policy, provide a name and description and create the policy
- Check the box next to the newly created policy
- Choose Review and then Create User
After you create your user you can view and download the auto generated access key id and secret access key, which is what you’ll put in your .Renviron file.
Whew, ok….that was a lot of work! But after all that I had the keys I needed to authenticate using R.
Actually Getting a File Stored in S3 into my Shiny App
One of the requirements for my app was that when the user selected a pet name, a picture of the pet would be displayed. The actual pictures themselves were stored in S3. Using get_object() from the aws.s3 package, I was able to pretty easily get the pictures into R, however the get_object() function returns objects as raw vectors. I had never encountered a raw vector in R and wasn’t really sure what to do with it.
Luckily, for images, I found this great blog post early on that detailed how to use the magick package with Shiny apps and was thus able to incorporate it in my app.
This is the code within my server.R file that I used to get a pet image from S3. The pet picture field is a field that contains the full URL to where the picture is stored on S3 (e.g. https://s3.amazonaws.com/pet-records/pet-images/1_layla.png).
 # get pet image to be displayed in side panel
  output$pet_image <- renderImage({
    req(input$pet)

    tmpfile <- pet_records()$dimPets %>%
      filter(pet_name %in% input$pet) %>%
      select(pet_picture) %>%
      str_replace("https://s3.amazonaws.com", "s3:/") %>%
      get_object() %>%
      image_read() %>%
      image_write(tempfile(fileext = ".png"), format = "png")

    list(src = tmpfile,
         height = "200px",
         contentType = "image/png")
  }, deleteFile = TRUE)
Getting PDFs and displaying them in my app was a little more challenging. I had a hard time figuring out the equivalent image_read() image_write() steps for PDFs in R. In a lot of the examples I was seeing online of people who had displayed PDFs within Shiny apps, an iframe was used to do so. Most people set the src argument of iframe to the URL where the PDF was located. I had URLs for my PDFs, but they were in a private S3 bucket and just plugging in the URL resulted in an “access denied” error.
In researching this issue, I came across an idea about using a pre-signed URL to access protected documents in S3. From what I understand, a pre-signed URL is just a URL with all of the authentication info baked into the URL itself. I wasn’t sure this was 1) possible to do or 2) a secure way to do it since I might be exposing my credentials to the world in a pre-signed URL. I posted a question about possibly using a pre-signed URL to the author of the aws.s3 package, Thomas Leeper, and he graciously suggested that I stick with using get_object() and to use writeBin() for handling the raw vector PDFs!

After that tip, I was able get the PDFs from S3, write them to a folder, and display them within my app. I display PDFs of exam notes, test results, and vaccines certificates within the app. Below is the code I used to get test result PDFs, so they could be displayed. I was able to use writeBin() to write the raw vector PDF (result of using get_object()) to the www folder and then just plug that path into the iframe src argument. Similar logic was used for getting exam notes and vaccine certificates.
# get test results file if test is selected in timeline
  output$test_results <- renderUI({
    if (show_test_results_fun()) {
      if (!is.na(test_result())) {
        test_result() %>%
          str_replace("https://s3.amazonaws.com", "s3:/") %>%
          get_object() %>%
          writeBin("www/test_result.pdf")
        tags$iframe(style = "height:1400px; width:100%", src = "test_result.pdf")
      } else {
        h3("No Test Results Available")
        }
    }
  })
Working with the timevis Package
The timelines in my app are a center piece for how the app works. Different items are displayed based on a user’s selections within the timelines. The timevis package has great documentation and the demo site has fantastic examples, which I was pretty easily able to follow and use.
However, there was one issue that took me a little time to figure out. When a timeline is created using timevis, there are certain pieces of information that are available as Shiny inputs. One of those inputs is input$timeline_name_selected, which returns the IDs (a vector) of the selected items in the timeline. I used these IDs to select the correct information relating to visit details, exam notes, test results, etc. in my app so they could be displayed to the user when a selection on the timeline was made. One problem, I found was that if the user had selected an item in the timeline and then changed the pet filter (e.g. selected Lloyd instead of Layla), there would be errors displayed to the user because input$timeline_name_selected had not changed even though the pet filter had. In essence, R was trying to filter the data based on an ID that didn’t exist when the pet filter was changed. I tried setting the value of input$timeline_name_selected back to NULL if the pet filter was changed but that didn’t work.
observeEvent(input$pet, {
      input$med_history_timeline_selected <- NULL
    })
I got an error stating “Attempted to assign value to a read-only reactivevalues object.” In the end, I was able to utilize reactiveValues to solve this problem.
  # define reactiveValues to prevent errors when user has an item selected in a timeline
  # and then changes the pet filter or routine visits checkbox
  # reactive values
  values <- reactiveValues(med_tl_selected = NULL, vacc_tl_selected = NULL )

  # pass value of input$med_history_timeline_selected to reactive value
  observe({
    values$med_tl_selected <- input$med_history_timeline_selected
  })

  # clear selection if different pet is chosen or routine visits is checked or unchecked
  observeEvent(c(input$pet, input$routine_visits), {
    values$med_tl_selected <- NULL
  })
In the remainder of my code, instead of using input$med_history_timeline_selected, I used values$med_tl_selected. I used the same logic with the vaccine timeline and selections. Pretty nifty!
All in all, creating my first Shiny app was fun and I learned a ton. The complete code for the app can be found in my Github respository if you are interested!
Leave me a comment if you have any feedback on the underlying code or design of the app!